Ubuntu Linux: Install Google Chrome Browser Command

You can get a fast, free web browser from Google. You will find binary packages for the Debian/Ubuntu/Fedora/openSUSE Linux. In this, FAQ I'm going to explain how to install Chrome browser in three simple steps.

Step #1: Download Google Chrome

You need to visit the following url to grab the .deb file. Make sure you download 32 bit or 64 bit .deb version:Download Chrome Browser
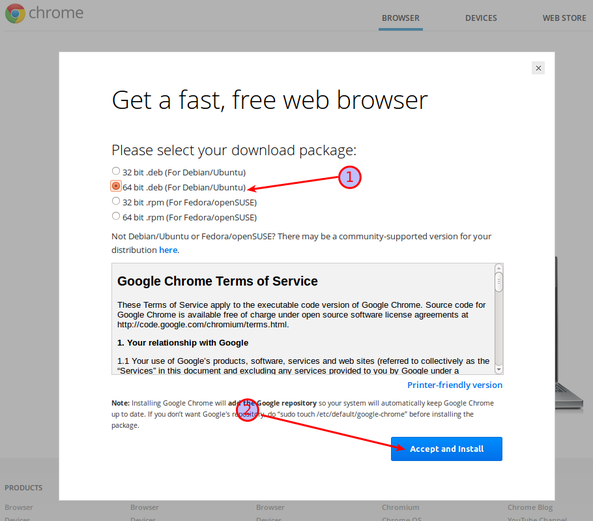
Fig.01: Download Google Chrome 32/64 bit deb package for Ubuntu Linux

Download 32 bit version

Open a terminal (press CTRL-ALT-t and type the following wget command to grab .deb file:
$ cd /tmp
$ wget https://dl.google.com/linux/direct/google-chrome-stable_current_i386.deb

Download 64 bit version using command line

Open a terminal (press CTRL-ALT-t and type the following wget command to grab .deb file:
$ cd /tmp
$ wget https://dl.google.com/linux/direct/google-chrome-stable_current_amd64.deb

Sample outputs:
--2013-05-07 15:19:24--  https://dl.google.com/linux/direct/google-chrome-stable_current_amd64.deb
Resolving dl.google.com (dl.google.com)... 173.194.36.39, 173.194.36.35, 173.194.36.40, ...
Connecting to dl.google.com (dl.google.com)|173.194.36.39|:443... connected.
HTTP request sent, awaiting response... 200 OK
Length: 42434828 (40M) [application/x-debian-package]
Saving to: `google-chrome-stable_current_amd64.deb'
 
100%[======================================>] 4,24,34,828  466K/s   in 89s
 
2013-05-07 15:20:53 (466 KB/s) - `google-chrome-stable_current_amd64.deb' saved [42434828/42434828]
 

Step #2: Install .deb file

Type the following command to install 32 bit version:
$ sudo dpkg -i google-chrome-stable_current_i386.deb
Type the following command to install 64 bit version:
$ sudo dpkg -i google-chrome-stable_current_amd64.deb
Fig.02: Errors were encountered while processing

Step #3: Fixing "errors were encountered while processing" error

Type the following command to fix the error and install Chrome:
$ sudo apt-get -f install
Sample outputs:
Reading package lists... Done
Building dependency tree
Reading state information... Done
Correcting dependencies... Done
The following extra packages will be installed:
  libnss3-1d libxss1
The following NEW packages will be installed:
  libnss3-1d libxss1
0 upgraded, 2 newly installed, 0 to remove and 0 not upgraded.
1 not fully installed or removed.
Need to get 22.0 kB of archives.
After this operation, 162 kB of additional disk space will be used.
Do you want to continue [Y/n]? y
Get:1 http://in.archive.ubuntu.com/ubuntu/ precise-updates/main libnss3-1d amd64 3.14.3-0ubuntu0.12.04.1 [13.4 kB]
Get:2 http://in.archive.ubuntu.com/ubuntu/ precise/main libxss1 amd64 1:1.2.1-2 [8,646 B]
Fetched 22.0 kB in 0s (23.6 kB/s)
Selecting previously unselected package libnss3-1d.
(Reading database ... 197880 files and directories currently installed.)
Unpacking libnss3-1d (from .../libnss3-1d_3.14.3-0ubuntu0.12.04.1_amd64.deb) ...
Selecting previously unselected package libxss1.
Unpacking libxss1 (from .../libxss1_1%3a1.2.1-2_amd64.deb) ...
Setting up libnss3-1d (3.14.3-0ubuntu0.12.04.1) ...
Setting up libxss1 (1:1.2.1-2) ...
Setting up google-chrome-stable (26.0.1410.63-r192696) ...
update-alternatives: using /usr/bin/google-chrome to provide /usr/bin/x-www-browser (x-www-browser) in auto mode.
update-alternatives: using /usr/bin/google-chrome to provide /usr/bin/gnome-www-browser (gnome-www-browser) in auto mode.
Processing triggers for libc-bin ...
ldconfig deferred processing now taking place

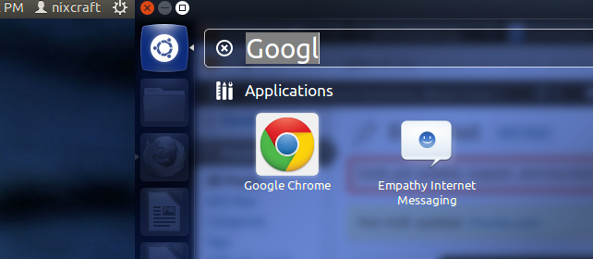
How do I use Google Chrome?

Simply type the following command:
google-chrome
google-chrome http://www.cyberciti.biz/

Or use GUI option > Press Windows key > Type Google or Chrome in unity search bar:
Fig.03: Starting Google Chrome browser

So there you have it-the ultimate and fast Google Chrome running on Ubuntu Linux:
Fig.04: Google Chrome in action

Remote desktop to Ubuntu 12.04 from Windows 7

Desktop Sharing in Ubuntu 12.04 does not support RDP (remote desktop protocol ),so we need to install xrdp to allow connection from Windows 7 Remote Desktop.

Requirements:
  • xrdp install on Ubuntu 12.04
  • Windows 7 professional or higher
1.Install xrdp in ubuntu 12.04.Open a terminal by pressing CTL+ALT+t ,then run below command
sudo apt-get install xrdp
2.Open Remote Desktop Connection in Windows 7.(click Start button,then search “remote” in search box)
2.Input the host name or IP address of your Ubuntu machine ,then click Connect
3.Input your username and password of Ubuntu ,then click Ok to connect
4.You are done,enjoy
Note:you can run below command to disable this service in Ubuntu 12.04
sudo service xrdp stop

Share Internet Connection With Android in Ubuntu 14.04

create wifi hotspot for android
This quick tip is going to show you how to create wifi hotspot in Ubuntu 14.04 so that you can share a wired internet connection with Android devices through your wireless card.
I’ve written about this in another post using a third-party app called ap-hotspot, but some readers said that not work.
The pre-installed Network Manager in Ubuntu Unity does not support Access Point (AP) mode which is required for Android devices. Fortunately, KDE’s connection editor support this mode, below is how:
NOTE: To do below steps, your Wireless Card must support Access Point (AP) mode.
1. Click the link below to bring up Ubuntu Software Center and click install kde-nm-connection-editor:
2. Once installed, press Alt+F2 and run command to launch the app:
kde-nm-connection-editor
launch kde connection manager
3. Click Add button and choose “Wireless (shared)” from the drop-down list.
create-wireless-point
4. Type in a name, ssid, and select Access Point mode. If want, set up a password under Wireless Security tab. Finally, click OK.
create-wireless-point1
5. Already connected Wired internet? OK, click Network Manager applet on Unity panel and then choose “Connect to Hidden Wi-Fi network”, choose the connection you created in previous step and click Connect button.
connect-to-wireless
6. Finally, your Network Manger menu should like this:
wifi-hotspot-connected


Turn on WLAN on your Android phone and you’ll see the access point in the list. Click connect and enjoy!

http://ubuntuhandbook.org/

3 Ways to Create Wifi Hotspot in Ubuntu 14.04 (Android Support)

create wifi hotspot in Ubuntu for android
Dear readers, I’ve found a new way to create wireless hotspot in Ubuntu, AP mode with Android devices support, using Unity’s Network Manager.
After this tutorial, I’ve found 3 ways to create wifi hotspot in ap mode:
  1. Using Ap-hotspot, an open-source app from github: see this post.
  2. Using KDE connection editor, see the post.
  3. Using Unity’s Default Network Manager with a little hack. See below
Below I will show you how to use Unity’s default network manager to create a wireless hotspot with Android devices support, tested in 64-bit Ubuntu 1404 with Nexus 4 and Sumsung Galaxy ace3.
1. Disable WIFI and plug in an internet cable to your laptop so that your Ubuntu is connect to a wired internet and wireless is disabled.
2. Go to Network Icon on top panel -> Edit Connections …, then click the Add button in the pop-up window.
Edit Network Connections
3. Choose Wi-Fi from the drop-down menu when you’re asked to choose a connection type:
Choose Connection Type
4. In next window, do:
  • Type in a connection name. The name will be used later.
  • Type in a SSID
  • Select mode: Infrastructure
  • Device MAC address: select your wireless card from drop-down menu.
create-wifi-hotspot
5. Go to Wi-Fi Security tab, select security type WPA & WPA2 Personal and set a password.
6. Go to IPv4 Settings tab, from Method drop-down box select Shared to other computers.
wifi-ipv4
When done, click the save button.
After above steps, a configuration file created under /etc/NetworkManager/system-connections directory. File name is same to the connection name you typed in step 4.
Now press Ctrl+Alt+T on keyboard to open terminal. When it opens, paste the commands below and hit enter to edit the configuration file:
gksu gedit /etc/NetworkManager/system-connections/wifi-hotspot
Replace wifi-hotspt with the connection name you typed in step 4.
When the file opens, find out the line mode=infrastructure and change it to mode=ap. Finally save the file.
Change to AP mode
When everything’s done, enable WIFI from Network Manager icon on the panel. It should automatically connect to the hotspot you created. If not, select “Connect to Hidden Wi-Fi Network …” and select it from the drop-down box.
wifi-hotspot
Now you can search and connect the access point from your Android mobile and enjoy!

http://ubuntuhandbook.org/

How to Install Android Studio in Ubuntu 14.04/14.10/12.04 via PPA

Install Android Studio in Ubuntu
Quick tutorial shows you how to install Android Studio, a new Android development environment developed by Google and based on IntelliJ IDEA, via PPA in Ubuntu 14.10, Ubuntu 14.10, Ubuntu 12.04 and the next Ubuntu 15.04.
Similar to Eclipse with the ADT Plugin, Android Studio provides integrated Android developer tools for development and debugging.
On top of the capabilities you expect from IntelliJ, Android Studio offers:
  • Gradle-based build support.
  • Android-specific refactoring and quick fixes.
  • Lint tools to catch performance, usability, version compatibility and other problems.
  • ProGuard and app-signing capabilities.
  • Template-based wizards to create common Android designs and components.
  • A rich layout editor that allows you to drag-and-drop UI components, preview layouts on multiple screen configurations, and much more.
  • Built-in support for Google Cloud Platform, making it easy to integrate Google Cloud Messaging and App Engine as server-side components.
android-studio

Install Android Studio via PPA in Ubuntu:

Installing Android Studio in Ubuntu becomes easy. A Ubuntu PPA contains simple script that automatically downloads and installs the latest release from Google download server. So far, Ubuntu 15.04, Ubuntu 14.10, Ubuntu 14.04, and Ubuntu 12.04 are supported.
1. Android Studio depends on Java, and Oracle Java 7 or 8 is recommended. PressCtrl+Alt+T on keyboard to open terminal. When it opens, run the commands below one by one:
sudo add-apt-repository -y ppa:webupd8team/java

sudo apt-get update

sudo apt-get install oracle-java7-installer oracle-java7-set-default
2. To add the Android Studio PPA, run the command:
sudo add-apt-repository ppa:paolorotolo/android-studio
Then update package lists and install the script:
sudo apt-get update

sudo apt-get install android-studio
Depends on your internet connection, it takes a few minutes downloading the source package.
Install Android Studio from PPA
Once installed, start the setup wizard from the Unity Dash (may need restart), or just run command /opt/android-studio/bin/studio.sh.

Credits to http://ubuntuhandbook.org/

How to create a bootable USB stick on Ubuntu

To create a USB stick from which you can install Ubuntu, you must first download Ubuntu. Then, follow these instructions:
  1. 1
    Insert a USB stick with at least 2GB of free space.
  2. 2
    Open the dash and search for Startup Disk Creator.
  3. 3
    Select the Startup Disk Creator to launch the app.
  4. 4
    Click 'Other' to choose the downloaded ISO file.
  5. 5
    Select the file and click 'Open'.
  6. 6
    Select the USB stick in the bottom box and click 'Make Startup Disk'.
  7. 7
    That’s it! When the process completes, you’ll be ready to restart your computer and begin installing Ubuntu.

Install MySQL Workbench on Ubuntu 14.04 and CentOS 6

I will show you the installation of MySQL workbench on Ubuntu 14.04 and CentOS 6 which is good tool for managing database.
Let’s start Installation of MySQL Workbench.
– Download, Install & Update MySQL WorkBench Repository Package for Ubuntu 14.04
You can download the package using below command.
Install Package using dpkg command
Update Repository
Install MySQL Workbench package using apt-get
During Installation it will ask Which MySQL product do you wish to configureSelect Workbench.
apt-config workbench
Next It will ask Which Server version do you wish to receive. Select workbench-6.3
Select Version of workbench
In Next Screen click on apply.
Apply for workbench
Check version of MySQL workbench
– Download, Install & Update MySQL Workbench Repository Package for CentOS 6
You can download the package using below command
Install Package using rpm command
Install MySQL Workbench package using yum install
If you get above error, follow below steps.
Add EPEL repository
Install package tinyxml
Again install MySQL Workbench package using yum install
Check version of MySQL workbench
Thanks for reading. Do let us know if you have any feedback/suggestions.
Let us know if you want us to write us on any particular topic. We will try our best.

Source By http://www.devopsservice.com/